The Tromp Queen COOKS!

The Tromp Queen Cooks! Family Favorites: old and new — all delicious!


Leave a comment

Manti

When we visited Turkey a couple of years ago, one of the meals our two teenagers enjoyed most was a big dish of Manti. According to a wonderful Turkish cookbook I have,

Manti are the ravioli of Anatolia. They are admittedly a little fussy to make, as the dough is to be rolled thinly and cut into fine squares, filled with a smidgeon of meat and sealed into neat little parcels. But the effort is well worth it – they taste delicious with the traditional distinctive yogurt, garlic and herbed butter topping.

For our young Turkish niece and nephew, Manti is one of their favorite comfort foods — it is their macaroni and cheese.

After looking through my lovely Turkish cookbook, my daughter asked if we could try making homemade Manti. We go the ingredients and dove into the process. My daughter and I made the dough, rolled it as thinly as we could then cut it into 1 1/2″ squares. We stuffed each square with meat and pinched the corners shut into the special four corner shaped little packets.

Image by thebittenword via Flickr CC license

Image by thebittenword via Flickr CC license

Image by thebittenword via Flickr CC license

Image by thebittenword via Flickr CC license

This took FOREVER! After all that the only thing left to do is boil them for a few minutes until they are cooked through (and float in the boiling water) and cook the simple yogurt sauce that goes on top.

Restaurant worker making tiny manti pasta in Istanbul. The best manti originated in Kayseri and is filled with minced lamb. Image by Phil Norton via Flickr CC license

Restaurant worker making tiny manti pasta in Istanbul. The best manti originated in Kayseri and is filled with minced lamb. Image by Phil Norton via Flickr CC license

We came to the conclusion that using meat-filled tortellini would make everything so much easier and that it would taste essentially the same. So that is what I’m suggesting you do, too. Our homemade version was delicious, but we do not think the time and effort involved made a huge difference from buying ready made tortellini (except for the shape, which most Americans won’t know about anyway).

So — buy enough meat-filled tortellini for your family and cook it as directed on the package.

Manti; Image by Sean Munson via Flickr CC license

Manti; Image by Sean Munson via Flickr CC license

For the Manti taste, you definitely need the sauce. Here’s how to make it:

Melt 1/4 c. butter (or use extra virgin olive oil) in a skillet.
Add 2 or 3 (or more to taste) cloves of minced garlic (cook briefly), then add 2 t. paprika, 1 t. dried red chili flakes (or use 1/2 t. is you like less spice). The recipe says to add some dried mint (2 t.) but we didn’t have it that way in Turkey so I didn’t add that.

To serve:
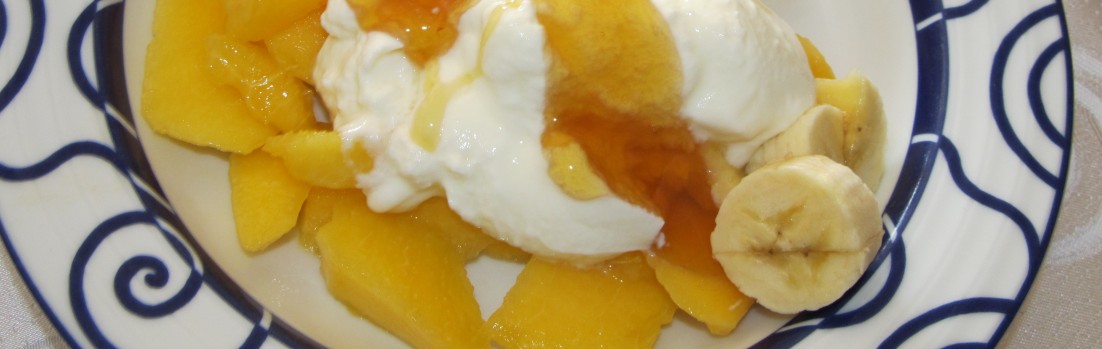
Top each serving of hot, freshly cooked meat-filled tortellini (our Manti substitute) with a large dollop of plain Greek yogurt and a generous drizzle of the flavored butter (0r olive oil) mixture. Stir to combine as desired and season with salt and pepper to taste. Top with grated parmesan cheese.

Serve with a salad and warm, crusty bread. YUM!!

You could use cheese tortellini to make this a vegetarian dish. You could also use (meat-filled or cheese-filled) ravioli instead of tortellini if you want bigger bites. You might need to make more sauce if you use ravioli, though.

Ingredients needed:
Enough meat-filled tortellini for your folks and hot boiling salted water in which to cook it
2 c. plain Greek yogurt (full fat is better than non-fat for this dish)
1/2 c. butter or olive oil
several cloves of garlic
paprika
dried red chili flakes
(optional: dried or fresh mint)
parmesan cheese

The lovely Turkish cookbook is called Turkey: More than 100 Recipes with Tales from the Road by Leanne Kitchen.

Related Articles:

Making manti, turkish dumplings, as seen in the February 2008 issue of Martha Stewart Living. Each dumpling is filled with lamb, onion and parsley. They are served with a yogurt sauce and melted butter.

Read the recipe and all about how to make Manti here at thebittenword.com.

Image by Hui via Flickr CC License.

Image by Hui via Flickr CC License.


Leave a comment

The Tromp Queen’s Three Bean and Artichoke Summer Salad

In the last few years I have grown to enjoy three-bean salad.  You know, the kind my Mom likes — with kidney beans, green beans and wax beans, etc. in a sweet vinegary dressing?

I definitely did NOT like this type of salad when I was younger, but I must have acquired the taste for it somewhere along the line because I often make it now.

Image by Mary Lee Hahn via Flickr CC license http://tinyurl.com/qesj7bl

Image by Mary Lee Hahn via Flickr CC license http://tinyurl.com/qesj7bl

Well, the recipe I keep coming back to is Mollie Katzen’s in her “get cooking” book.

Recently, we were getting ready to grill brats (which is practically a required summer activity in Wisconsin), and I suddenly realized I didn’t have anything for a side dish.  I thought of making three bean salad, and went to my pantry cupboard to see if I had all the ingredients.  Well, I had most everything but not all the “usual” ingredients — so I’ll share what I came up with because I think it turned out to be very tasty.

Ingredients:

1 (15 oz.) can chickpeas
1 (15 oz.) can green beans
1 (15 oz.) can wax beans (yellowish, light green beans)
12 oz. jar marinated artichoke hearts (quartered or chopped is fine)
1 cucumber (peeled, seeded, diced)
1 small onion (diced)  Red onion is pretty if you have it.
(if I had had celery or green pepper I would have diced them and added that, too)

Drain all the canned ingredients. Rinse the beans.  You could decide not to drain the artichokes (and just add the marinade to the dressing) but I didn’t do that this time.  Combine all the above ingredients in a large bowl and mix gently.

In a small to medium-sized bowl combine these ingredients for the dressing:

1/4 c olive oil
1/4 c red wine vinegar
1 teaspoon sugar
1 teaspoon yellow mustard (any kind is fine)
1/2 teaspoon salt
1/4 teaspoon black pepper

That is it.

If you have time to make this ahead and chill it, the flavor would be even better.  I sometimes use fresh green beans or a bag of frozen green beans (cooked and chilled); they taste better than canned.

Suggested tweaks:  Next time I might add some kalamata or green pimento stuffed olives.  Maybe dill or a little garlic?  A squirt of lemon juice?

The original recipe calls for 1 can (15 oz.) dark red kidney beans in place of the artichokes and doesn’t have the cucumber. But now that I’ve had three bean salad with cucumber and artichokes, I really like them in there.  I would add them AND the kidney beans next time.  In the past, I’ve also added other kind of beans I’ve had on had such as butter beans (which my Mom loves), baby limas, black beans, pinto beans, etc.  If you add several more kinds of beans, you will need to double the dressing recipe and scale up the other ingredients as well (onion, celery, etc.)

I hope you enjoy this Tromp Queen tweak to traditional Three Bean Salad.
Please let me know if you try it and how you like it!

Yet another simple addition: Pasta!  (and maybe shredded carrots, too?)

Image by Penny via Flickr CC license. http://tinyurl.com/o6kwf8l

Image by Penny via Flickr CC license. http://tinyurl.com/o6kwf8l


Leave a comment

Recipe Review: Falafel Burgers

image by tonx via Flickr CC

image by tonx via Flickr CC

The best Falafel sandwich I have ever had was near the British Museum in London.  There was a little sandwich shop just around the corner from the main entrance.  The falafel was declicious, but the “fixins” were wonderfully fresh, crisp and flavourful.  (Spelled it the British way for good measure, there!)

I looked at Google maps in that area around the British Museum and the best possibilities are Salt and Pepper (5 Bloomsbury Street, London WC1B 3QE, England) or Bimbimbab Cafe (37 Museum Street, London WC1A 1LP, England).  The menu and reviews at Salt and Pepper remind me more of the cafe, but the photo of Bimbimbab’s interior also looks familiar.  It was not a Korean restaurant at the time if that is indeed the place we had falafel.  It was 2008, so it is not likely I can solve this mystery now (unless someone in London can shed light on my memory!)

I’ve looked for a good recipe to try to recreate this memorable sandwich.  The closest so far is a recipe from Rachael Ray.

My daughter and I made Rachael Ray’s Falafel Burgers recipe for dinner tonight.

We tweaked the recipe a bit so I thought I’d share our results and thoughts here.

Here is the link to her original recipe.

Lebanese falafel, lettuce, tabouleh, tomato and tahini on flatbread.

image by Rain Rabbit, via Flickr CC; falafel dindins

Here is our “tweaked” recipe:

  • 2 cans chickpeas (15 ounces each), drained and rinsed.  (They are also called garbanzo beans).
  • 1/2 small red onion, chopped
  • 3 cloves garlic, grated or finely chopped
  • A large handful of flat leaf parsley, chopped
  • 3-4 tablespoons flour, plus more for coating the falafel patties
  • 4 teaspoons Penzeys Sweet Curry Powder
  • 2 teaspoons Penzeys Medium Hot Chili Powder
  • 1 T. extra virgin olive oil
  • Salt and freshly ground black pepper, to taste. We used about 1 t. salt and 1/2 t. black pepper.

Extra Virgin Olive Oil for frying.

Combine these ingredients (above) in a large food processor.  You might need to do 1 can of chickpeas and 1/2 the other ingredients at a time, then blend it all together in a bowl.  We found the full amount to be too much for my Cuisinart.  If the mixture seems too dry to hold together, add a little more olive oil.  If it seems too wet — don’t even add the olive oil and/or add more flour.

Divide the chickpea mixture into 8 parts.  Form into patties.  Dredge lightly in flour.
Heat plenty of extra virgin olive oil in a large skillet.  You need 1/4 c. or so of oil or sometimes more depending on how large your skillet is.

Fry the falafel patties about 3-4 min. on each side or until lightly browned and heated through.  You can use more oil and completely deep fry them, but I think pan frying tastes good and uses so much less oil

To make the sauce combine the following in a small bowl:

  • 1/4 cup tahini paste
  • 2 tablespoons water (or more if needed)
  • Juice and zest of 1 lemon

Prepare the “fixins” for serving:

  • 4 sandwich-size whole wheat pita pockets (cut in half, warm in oven or toast lightly)
  • 1-1 1/2 cups romaine lettuce, shredded
  • 1/2 English (seedless) cucumber; peel, de-seed, quarter, slice and dice
  • chopped fresh flat-leaf parsley; a large handful
  • 2 vine-ripe tomatoes, sliced or garden fresh cherry tomatoes (cut into halves or fourths)
  • (In the street falafel photo below, I see he is offering radishes, jalapeno slices and lemon wedges, and possibly baby spinach, too.  It is difficult to see — but I think the idea is toppings galore and whatever you crave!)

To serve:

Fill 1/2 a warmed pita with fixins, sauce and falafel.  Have plenty of napkins ready.  Sometimes I end up eating it with a fork.

image by Daniel Roy, via Flickr CC; falafel stand in Aleppo, Syria.

image by Daniel Roy, via Flickr CC; falafel stand in Aleppo, Syria.

REVIEW:

I’ve made this recipe several times.  The biggest issue is getting the consistency right so the falafel doesn’t fall apart in the skillet.
The fixings are important.  Use fresh and local if possible; organic always tastes better to me, too.  Maybe that is just in my head, though.

The original recipe calls for twice as many spices and several quite expensive ones.  I have used 1/2 the amounts in the RR recipe and it was good.  This is the first time we used the Sweet Curry instead of all the cumin, coriander and turmeric.  Feel free, of course, to adjust the spice levels to your taste.

OVERALL:  FIVE OUT OF FIVE FORKS!!

Highly recommended.

Please let me know if you try this recipe, how it turned out, and if you enjoyed it.