Turmeric image by Steven Jackson, via Flickr CC license
Chickpea Curry
2 Tablespoons olive oil
1 large onion, finely chopped
2 garlic cloves, minced
1 approximately 2-inch piece of ginger, grated
2 teaspoons Sweet Curry powder
1 teaspoon Penzeys Curry Now powder
2 teaspoons ground cumin
2 teaspoons ground coriander
2 teaspoons paprika
1/2 teaspoon turmeric
½ teaspoon cayenne pepper
3 (15 oz ) cans chickpeas, drained and rinsed (smash one can with a fork)
28 oz can, petite diced tomatoes
1 can full fat coconut milk
2-3 teaspoons cornstarch
1/2 – 1 teaspoon salt
Chopped fresh cilantro
Directions
Heat olive oil in a large saucepan over medium-high heat.
Add onions, salt; sautè until translucent, about 6 minutes stirring every now and then. Add garlic and sautè for 1 more minute.
Add ginger and all the spices; sauté until fragrant, about 30 seconds.
Add diced tomatoes then chickpeas.
Bring to a boil, lower to a simmer and cook for 15 minutes.
Stir in coconut milk and simmer for 5 more minutes.
In a small bowl mix cornstarch with 2 tablespoons of water. Stir in the chickpea mixture and cook for 5 more minutes or until thickened.
Take a taste and adjust seasoning if needed.
Remove from the heat, sprinkle with chopped fresh cilantro.
Serve over basmati or brown rice.
I made this recipe for the first time this evening for our dinner. The balance and depth of flavors was very good. Most of the ingredients are easy to have on had, with the exception of the fresh cilantro (which seems to go bad in just a few days — or is it me?).
This is a quick and easy, delicious (meatless) curry.
I’ve tried several new recipes this week. I’m somewhat surprised to report that they were all really good.
My daughter and I are both working on musical productions (at two different high schools — she is on the backstage crew for hers and I am the accompanist for mine). We had rehearsals every night this week either after school or evenings, and this weekend we have two concerts plus an extra rehearsal. Next week I have 6 shows (I think!) and two choir rehearsals and she has tech week (also known as Hell week in the theater realm).
SO — I’ve been looking for meals that are quick to fix and either either bake (can be left in the oven for an hour or more) or cook quickly.
Chicken walking through the village image by World Bank Photos via Flickr CC license
Chicken legs and thighs were on sale last week, so these are all chicken recipes.
Annabel Farley image of olives via Flickr CC license
Ingredients
For the Spice Mixture
¾ teaspoon salt
¼ teaspoon ground cumin
¾ teaspoon paprika
¾ teaspoon turmeric
⅛ teaspoon ground cayenne pepper
¼ teaspoon freshly ground black pepper
1 tablespoon extra virgin olive oil
1 tablespoon butter, melted
4 cloves garlic, pressed
For the Sheet Pan Chicken
1 lemon
2 large sweet onions, cut into 12 wedges each
2 teaspoons extra virgin olive oil
¼ teaspoon salt
1 teaspoon turmeric
3 skin-on chicken quarters (I used 8 chicken bone-in skin-on chicken thighs)
1 cup green olives, pitted
2 tablespoons chopped fresh cilantro leaves (I forgot to add this!)
Brian Siewiorek image of cilantro, via Flickr CC license public domain
Instructions
Preheat an oven to 450 degrees Fahrenheit.
In a small bowl, prepare the spice rub by combining the salt, cumin, paprika, turmeric, cayenne, and black pepper. Stir in 1 tablespoon of olive oil, 1 tablespoon of melted butter, and the pressed garlic.
Cut the lemon in half and set one half aside. Cut the remaining half into thin slices, then arrange the slices in a single layer on a rimmed half sheet pan. Scatter the onion wedges over the lemons, then drizzle 1 Tablespoon of olive oil over the onions. Sprinkle the pan with 1/2 teaspoon of salt and 1 teaspoon turmeric. (I think you could get by with 1/2 teaspoon of turmeric. It is SO expensive!)
Place the chicken quarters on the pan, skin side up. Pat the top of the chicken dry, then brush the prepared spice mixture evenly onto the skin of each quarter. I rubbed the spices all over the chicken with my hands.
Transfer the pan to the preheated oven and roast for 45 minutes, until the chicken reaches an internal temperature of 165 degrees and the juices run clear.
Scatter the pan with the olives and cilantro leaves. Squeeze the juice from the remaining half lemon onto the chicken. (I baked the olives on the pan with the chicken. I did remember the lemon juice, but forgot the cilantro.)
We had brown and wild rice with this. I poured the sauce from the pan over my rice and it was delicious.
Kosher salt and freshly ground black pepper, to taste
Mike Mozart image of green beans, via Flickr CC license
Instructions
In a gallon size Ziploc bag, combine chicken, olive oil, garlic, lemon juice, red wine vinegar and oregano; season with salt and pepper, to taste. Marinate for at least 20 minutes to 1 hour, turning the bag occasionally. Drain the chicken from the marinade, discarding the marinade.
Preheat oven to 400 degrees F. Lightly oil a baking sheet or coat with nonstick spray.
Place potatoes and green beans in a single layer onto the prepared baking sheet. Drizzle with olive oil and season with salt and pepper, to taste. Top with chicken in a single layer.
Place into oven and roast until the chicken is completely cooked through, reaching an internal temperature of 165 degrees F, about 45 minutes.*
Serve immediately, garnished with parsley, if desired.
This recipe was quick and easy, baked beautifully and was absolutely delicious.
Turmeric image by Steven Jackson, via Flickr CC license
Little Chicken image by poppy via Flickr CC
Pukka Yellow Curry
The next recipe was not quite so easy (my kitchen was a huge MESS by the time dinner was ready), but I think that might be just first-time-working-out-the-kinks issues. Pukka Yellow Curry is a Jamie Oliver recipe. The result was flavorful and very well spiced. It takes a pretty large pan to fit all the ingredients in.
Ingredients
2 onions
4 cloves of garlic
1 thumb-sized piece of ginger
2 yellow peppers
1 cube chicken bouillon
1-2 fresh red chillies (I used a jalapeno)
½ a bunch of fresh cilantro
1 teaspoon runny honey
1 level teaspoon ground tumeric
2 teaspoons curry powder (I used Penzey’s Sweet Curry)
8 chicken drumsticks
olive oil
1 (14.5 oz can) chickpeas
1 teaspoon tomato purée (I left this out.)
320 g basmati rice
1 lemon
OPTIONAL:
fat-free natural yoghurt , to serve
Peel the onions, garlic and ginger and de-seed the peppers. Put 1 onion, 1 pepper, the garlic and ginger into a food processor. Crumble in the stock cube and add the chilli (de-seed it first, if you prefer a milder curry), the cilantro stalks, honey and spices, then blitz to a paste.
Place a very large casserole pan on a medium-high heat and fry the chicken drumsticks (pull the skin off first, if you prefer) with a splash of oil for 10 minutes, or until golden, turning occasionally with tongs. Remove the chicken to a plate, leaving the pan on the heat. Roughly chop the remaining onion and pepper and add to the pan to cook for a few minutes, then tip in the paste and let it cook down for around 5 minutes. Pour in 500ml of boiling water. Drain the chickpeas and add along with the tomato purée and a pinch of salt and pepper, then stir well. Return the chicken to the pan, pop the lid on, reduce the heat and simmer gently for around 45 minutes, or until the sauce darkens and thickens. Sprinkle with chopped fresh cilantro leaves.
With 15 minutes to go, put 1 cup (320g) rice and 2 cups of boiling water into a pan with a pinch of salt and simmer with the lid on for 12 minutes, or until all the liquid has been absorbed. Serve the curry in the middle of the table with a few dollops of yoghurt (if using) and a scattering of coriander leaves, with lemon wedges for squeezing over and the fluffy rice on the side.
Heat the oven to 375 degrees. Heat olive oil in a large oven proof skillet and then add the chicken. Season with salt and pepper. Brown on both sides. The chicken doesn’t have to be completely cooked through. Remove the chicken from the skillet and set it aside. Add more oil if needed. Saute the onion until softened add the garlic and saute about a minute more. Then add the broth, lemon juice, and red pepper flakes. Reduce the liquid until about 1/3 to 1/2 cup remains. Add the butter and whisk (or use a fork) until it is melted. Remove the pan from the heat and slowly add the cream. Put the chicken in the sauce and then stick the whole thing in the oven for 5 minutes or so to finish cooking the chicken and heat up the sauce. Serve with hot cooked pasta or noodles. Sprinkle with freshly chopped parsley or basil.
image via Flickr CC by cookbookman17; Fresh Parsley — A bunch of fresh hand picked parsley. This parsley is bursting with flavor and ready for use.
XL Beef Enchilada image by Cris via Flickr CC license.
I don’t remember where I got this recipe. As with most of the recipes I use, I’ve tweaked it a bit. My son (now 20) will request these every once in a while. It is probably because they are HUGE and have plenty of cheese. He has lived in Wisconsin since just before his first birthday so he is a native Cheesehead.
Beef and Rice Enchiladas
1 pkg. 6.8oz Spanish rice and vermicelli mix (such as Rice-a-roni)
1 lb. ground beef (or pinto beans)
20 oz. enchilada sauce (large can – I’ve used red or green)
10 large tortillas, warmed (could use corn)
4 c. sharp cheddar cheese, shredded (can use less)
Sliced black olives, cilantro, sliced green onions – garnish as desired
Prepare the rice mix according to package directions (The brand I use calls for a 14oz can of diced tomatoes). Brown the beef in a skillet and drain. Combine the beef with the cooked rice mix; add 1 ¼ c. enchilada sauce to this mixture. Save the rest of the sauce for later.
Into each tortilla put:
½ to 2/3 c. rice/beef mix
¼ to 1/3 c. shredded cheese
(and anything else you want to add in there)
Put a little of the enchilada sauce in the bottom of a 13x9x2 baking dish. Place the filled tortillas in the dish. Pour the rest of the sauce over the enchiladas and top with the remaining cheese. Bake uncovered at 350 degrees for 20-30 minutes.
Makes at least 10 large enchiladas.
We usually eat these with refried beans, sour cream and sometimes guacamole and tortilla chips.
Enjoy!
Image of Wisconsin Cheese by Shihmei Barger via Flickr CC license
My mom used to make these yummy hot ham and cheese sandwiches for special events. They are quick to make and taste really good. Figure about 4 to 6 sandwiches per pound of ham, depending on how much ham you put on each bun.
This is what you need:
sliced ham — any kind is fine: shaved, spiral sliced, leftover.
sliced baby swiss cheese (1 or 2 slices per sandwich; or any kind of cheese you like)
mustard (any kind) — I like spicy brown or horseradish mustard best.
finely minced onion (or use onion powder)
butter
Soften 4 Tablespoons of butter. Add 2 T of mustard.
Mix in about 1 to 2 T. of minced onion (or more to taste).
Some recipes include 1 or 2 teaspoons of Worchestershire sauce in the mix as well. Mix all together.
Spread the butter/mustard/onion mixture on both sides of each hamburger bun, laying all the buns out on a cookie sheet or other flat surface.
Onto each bun bottom place a slice (or 1/2 slice of cheese) and your desired amount of ham (sliced or shaved). Top the ham with another slice of cheese (or 1/2 slice). Put a bun lid on each sandwich. Hopefully they all match up!
Wrap each ham and cheese sandwich in foil, sealing each little package tightly.
Place all the foil wrapped sandwiches on a cookie sheet. It is okay to stack them if you have too many.
Bake at 400 degrees for 15 to 20 minutes. Unwrap carefully. Enjoy!
I like to serve these with vegetables (carrots, celery, cucumber, radish) and dip (ranch, dill or spinach). They are also good with home made soup of any sort. Crispy green salad? You bet.
image of open faced ham and cheese fondue sandwich by Chris Gallevo via Flickr CC license
Okay, the photo above is not of this recipe. But it does look like a pretty amazing hot ham and cheese sandwich, right?
I have a couple more favorite chili recipes, believe it or not. Here is one that I created by combining several of my favorite recipes and adding some of my own flair, too.
Ingredients:
1.5 ground beef (85% lean)
1 onion, diced
3 cloves of garlic (run through garlic press or use the kind in a jar)
3 T. Penzeys Chili 3000
1 T. Penzeys Medium Hot Chili Powder
1/2 t. cumin
1 t. salt
1/2 t. sugar
25 grinds black pepper
1 large can (28 oz) whole tomatoes, drain and chop
1 small can (6 oz) tomato paste
2 cans (14 oz) dark red kidney beans, drain and rinse
2 c. water
4 c. tomato juice
Brown the ground beef; drain. You can add the garlic and onion while you brown the beef or add it after you brown it; if after, cook a few minutes more. Add the rest of the ingredients bring to a boil, then lower to a simmer. Cook, covered, at a simmer for an hour if you can. Less will be okay, but it will taste better if you cook it longer.
This makes a pretty large batch and is soupier than some of the other chili recipes I make.
Good and Cheap: A Cookbook by Leanne Brown. Print your own copy FREE! Follow the link in the blog post.
I found these great free cookbooks a while ago. But I just discovered the author’s website and the links to print PDF copies of both books FREE! The photography is absolutely gorgeous. The recipes look delicious and seem quite easy overall. It is refreshing to find this resource for inexpensive meals and snacks using fresh vegetables, fruits, and whole grains. Let’s get inspired to try something new this week that is good for OURSELVES and good for our WALLETS, too!
Good and Cheap is a cookbook written by Leanne Brown for people with very tight budgets, particularly those on SNAP/Food Stamp benefits. It is also a great resource for anyone wanting to eat healthy meals without spending a fortune. The PDF is free and has been downloaded more than 800,000 times.
Is the PDF really free? Can I print some recipes?
Yes it’s really free. Sharing the power of cooking is the whole point of the Good and Cheap project. Because the 1st edition is under a Creative Commons license, you are free to use the recipes however you like so long as you give Leanne Brown credit and you don’t make money off her work. Enjoy it!
Can I save the PDF to my computer?
Yep! To save a copy of Good and Cheap on your computer, right-click this download link instead of left-clicking. You should see a menu with an option like “Save Link As…” or “Save File As…”. If you select that option, you’ll be able to save the PDF to your computer. If that link doesn’t work, try this one.
From Scratch: A Cookbook by Leanne Brown. Print your own copy FREE! Follow the link in the blog post.
Leanne Brown’s first cookbook! From Scratch is a vegetarian cookbook intended for people just becoming comfortable in their own kitchens. Download a FREE pdf copy HERE.
These books are distributed under a Creative Commons Attribution – NonCommercialShareAlike 4.0 license. For more information, visit http://www.creativecommons.org/licenses/ by-nc-sa/4.0.
Heat the olive oil in 3 to 4 quart pan. Saute the onion until it softens and turns translucent. Toss in the garlic and saute for another minute or so, watching carefully so the garlic doesn’t burn. Add the salt, the petite diced tomatoes, tomato sauce and the rest of the herbs and spices. Heat to boiling, then lower the heat to simmer. Add in the artichoke hearts and olives. Cook the cheese tortellini (or any kind of pasta) according to package directions. Simmer the sauce until the pasta or cheese tortellini is ready. Serve topped with parmesan cheese. VERY GOOD!
Artichoke Hearts, marinated and quartered
I revised this recipe from “Herbed Artichoke Cheese Tortellini” that I found on Taste of Home’s recipe web site. I like the fact that it is made with mostly canned ingredients which is great when you live in Wisconsin and winter lasts about 9 months a year. Using the fresh parsley along with the canned artichokes and olives adds enough brightness to the flavor to make the effort of minimal effort of making the sauce well worth it.
Cheese Tortellini; Image by Laurent, via Flickr CC License. Tortellini aux chèvre et capres.
The sauce tastes great on cheese tortellini, but it also tastes great on any kind of pasta.
If you are really in a great hurry, I suppose you could use onion powder and garlic powder (or some sort of pre-chopped garlic in a jar) to speed the process even more. But seriously, this sauce is very quick to make even with chopping an onion and a couple cloves of garlic.
I hope you try this and please let me know how much you like it!
image via Flickr CC by cookbookman17; Fresh Parsley — A bunch of fresh hand picked parsley. This parsley is bursting with flavor and ready for use.
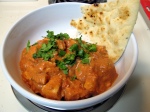
Chicken Tikka Masala; image by Stephen Rees via Flickr CC license.
One of my favorite Indian dishes is Chicken Tikka Masala. Well, that and Sag Paneer and Samosas and a lot of other Indian foods. But I digress. The other night I planned to make Chicken Tikka Masala for dinner using a crock pot recipe. Usually the problem I have with crock pot recipes is that I never seem to have time to actually put the stuff in the crock pot in the morning before I go to work. So that is kind of a fatal flaw in the whole plan to use a crock pot recipe.
When I got around to making dinner the only option was to make it on the stove top.
I realized I did not have one of the critical ingredients: Garam Masala. I DID have an empty jar of it from Penzeys so I read the list of ingredients on the label then gathered as many of those spices as I could from my spice cupboard (or should I say spice “hoard” — I have a LOT of spices). I looked online for recipes that could be made without Garam Masala and found a couple I thought sounded good. I used those two recipes as a guide, combining them and added a few things of my own. The result was DELICIOUS; maybe the best Indian dish I’ve made at home ever.
Chicken Tikka Masala; image by James via Flickr CC license.
Here is what I made:
Order of operations: Marinate the chicken, start the sauce, start the rice, cook the chicken, finish the sauce, combine chicken with sauce (add cilantro and cream if desired), serve with rice (and raita and naan if available).
Marinade:
1/2 to 3/4 cup plain Greek yogurt
1 tablespoon lemon juice
1 teaspoon ground cumin
1/2 teaspoon ground cinnamon
1/2 teaspoons cayenne pepper
½ t. cardamom
¼ t. cloves
¼ t. nutmeg
½ to 1 teaspoons freshly ground black pepper
1 tablespoon grated fresh ginger
1 teaspoons salt, or to taste
3 boneless skinless chicken breasts, cut into bite-size pieces
Combine all the marinade ingredients and mix well. You could use Garam Masala in place of some of the spices or just add 1 or 2 t. to the marinade with all the other spices. Add the chicken pieces. Let the chicken marinate in the yogurt sauce as long as you have time (mine only marinated for about 15 minutes).
Chicken Tikka Masala yogurt and spice marinade; image by JaBB via Flickr CC license.
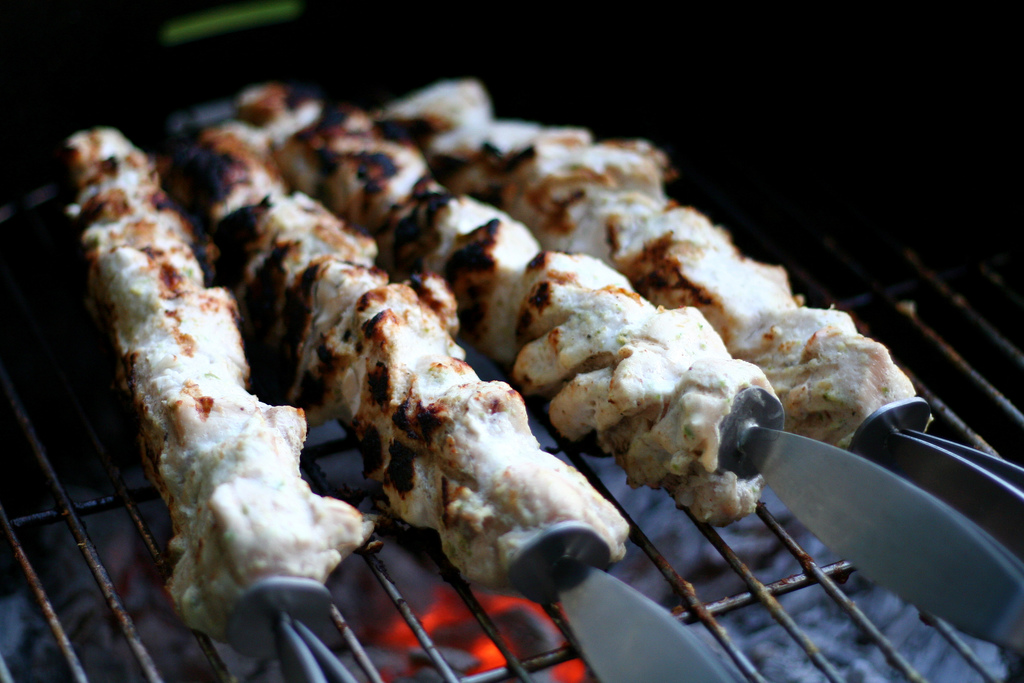
Either grill the chicken on skewers (which is the better way and makes a more yummy tasting final product) or brown it in small batches in a hot skillet with a little EVOO and butter til nicely browned (which is what I did because it was raining and I didn’t want to run in and out to the grill in the rain).
Grilling the chicken for Chicken Tikka Masala; image by Drew McClellan via Flickr CC license.
Sauce:
1 T. butter and 1 T. olive oil
1 large onion, minced
2 to 3 cloves garlic, minced
¼ t. cayenne pepper
1 t. ground cumin
1 t. paprika
½ t. salt, or to taste
1 (14 ounce) can petite diced tomatoes, drained
1 (8 ounce) can tomato sauce
Heat the EVOO and butter in a 3 qt. or larger pan. Saute the onion until it softens. Add the spices and salt and cook about 5 minutes more. Drain the petite diced tomatoes; add the tomatoes to the pan with the can of tomato sauce. Continue to simmer the mixture while you are cooking the chicken (either on the stove or on a grill). Just before you are ready to add the chicken to the sauce, use an immersion blender to puree the sauce and make it somewhat smoother. (You can skip this step, but your sauce will be lumpier).
Add the grilled/browned chicken to the sauce. Heat through and/or simmer for 5-10 minutes or until the rice is ready. Then add the final ingredients below:
½ c. half and half (optional)
1/4 cup chopped fresh cilantro
Chicken Tikka Masala; image by July Frost via Flickr CC license.
Rice:
I cook my rice on the stovetop. Heat 3 c. of water or broth (you can add 1/2 t. sweet curry or a few strands of saffron) and 1/2 t. salt or so to boiling. Add 1 1/2 c. of basmati rice (can rinse it first, but I don’t always do that). Stir. Turn the heat down so it will still be simmering, cover tightly and set the timer for 13 or 14 minutes.
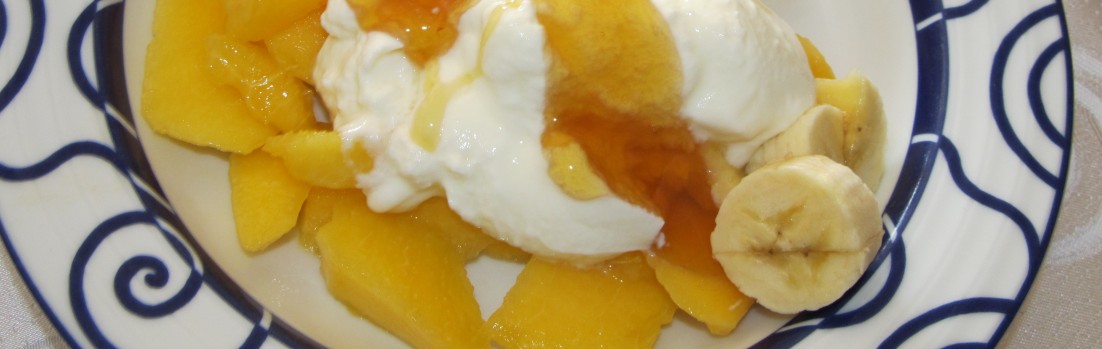
Serve the Chicken Tikka Masala over hot basmati rice with warm naan bread (Trader Joe’s has frozen naan that is very good) and cool smooth tangy raita.
Raita; image by Jules via Flickr CC license.
Chicken Tikka Masala; image by Guy Dickinson via Flickr CC license.
When we visited Turkey a couple of years ago, one of the meals our two teenagers enjoyed most was a big dish of Manti. According to a wonderful Turkish cookbook I have,
Manti are the ravioli of Anatolia. They are admittedly a little fussy to make, as the dough is to be rolled thinly and cut into fine squares, filled with a smidgeon of meat and sealed into neat little parcels. But the effort is well worth it – they taste delicious with the traditional distinctive yogurt, garlic and herbed butter topping.
For our young Turkish niece and nephew, Manti is one of their favorite comfort foods — it is their macaroni and cheese.
After looking through my lovely Turkish cookbook, my daughter asked if we could try making homemade Manti. We go the ingredients and dove into the process. My daughter and I made the dough, rolled it as thinly as we could then cut it into 1 1/2″ squares. We stuffed each square with meat and pinched the corners shut into the special four corner shaped little packets.
Image by thebittenword via Flickr CC license
Image by thebittenword via Flickr CC license
This took FOREVER! After all that the only thing left to do is boil them for a few minutes until they are cooked through (and float in the boiling water) and cook the simple yogurt sauce that goes on top.
Restaurant worker making tiny manti pasta in Istanbul. The best manti originated in Kayseri and is filled with minced lamb. Image by Phil Norton via Flickr CC license
We came to the conclusion that using meat-filled tortellini would make everything so much easier and that it would taste essentially the same. So that is what I’m suggesting you do, too. Our homemade version was delicious, but we do not think the time and effort involved made a huge difference from buying ready made tortellini (except for the shape, which most Americans won’t know about anyway).
So — buy enough meat-filled tortellini for your family and cook it as directed on the package.
Manti; Image by Sean Munson via Flickr CC license
For the Manti taste, you definitely need the sauce. Here’s how to make it:
Melt 1/4 c. butter (or use extra virgin olive oil) in a skillet.
Add 2 or 3 (or more to taste) cloves of minced garlic (cook briefly), then add 2 t. paprika, 1 t. dried red chili flakes (or use 1/2 t. is you like less spice). The recipe says to add some dried mint (2 t.) but we didn’t have it that way in Turkey so I didn’t add that.
To serve:
Top each serving of hot, freshly cooked meat-filled tortellini (our Manti substitute) with a large dollop of plain Greek yogurt and a generous drizzle of the flavored butter (0r olive oil) mixture. Stir to combine as desired and season with salt and pepper to taste. Top with grated parmesan cheese.
Serve with a salad and warm, crusty bread. YUM!!
You could use cheese tortellini to make this a vegetarian dish. You could also use (meat-filled or cheese-filled) ravioli instead of tortellini if you want bigger bites. You might need to make more sauce if you use ravioli, though.
Ingredients needed:
Enough meat-filled tortellini for your folks and hot boiling salted water in which to cook it
2 c. plain Greek yogurt (full fat is better than non-fat for this dish)
1/2 c. butter or olive oil
several cloves of garlic
paprika
dried red chili flakes
(optional: dried or fresh mint)
parmesan cheese
Making manti, turkish dumplings, as seen in the February 2008 issue of Martha Stewart Living. Each dumpling is filled with lamb, onion and parsley. They are served with a yogurt sauce and melted butter.
RECIPE REVIEW
Penzeys Recipe: Curried Chicken with Basmati Rice pilaf
In a food processor or blender combine and purée:
1 large onion, cut into eighths
3 cloves of fresh garlic
1 piece of fresh ginger root about 1″, peeled (or use 3/4 t. powdered ginger)
2 jalapeño peppers, quartered and seeded
Image by Jutta M. Jenning via Flickr CC license.
Image by Dubravko Soric via Flickr CC license
Image by Daniel R Blume via Flickr CC license
Image by Q family via Flickr CC license
In a large skillet:
Heat extra virgin olive oil (3 to 4 Tablespoons).
Brown 10 – 12 boneless skinless chicken thighs for about 4 min per side until browned.
Remove the chicken to a platter.
Add a little more oil if needed.
Add 1/2 t. whole cumin seeds and stir til they sizzle (1 min. or so).
Add the purée to the skillet along with
2 T. sweet curry powder
1/4 t. cayenne
1 t. salt
Cook all this for 5 to 10 minutes until it is golden and fragrant.
Add the chicken back to the skillet and stir to cover well with the curry.
Add 1 1/2 to 2 c. water or chicken broth.
Bring to a gentle boil. Lower heat, cover, and simmer for 30 min or so.
While the chicken curry is simmering it is time to make the rice.
Image by Laura Turner via Flickr CC license.
Basmati Rice Pilaf:
2 c. basmati rice
3 1/2 to 4 c. water or broth
1/2 t. sweet curry powder
1 t. salt
Heat water or broth to boiling. Rinse rice. Add rice and curry powder to boiling water. Return to a boil, lower heat to simmer, cover tightly and set the timer for 13 or 14 minutes. Check toward the end to be sure the rice doesn’t stick to the bottom of the pan. Fluff. Top with any or all of the optional stir ins below.
optional stir ins about 1/4 c. each:
sliced green onion
thawed frozen green peas
chopped fresh cilantro leaves
This recipe might look complicated but it is essentially just a few steps. The onion/garlic/ginger/jalapeño mixture is a breeze, then the chicken simmers in the sauce. While that cooks, then you are taking care of the rice.
My family really enjoys this curry! It is very tasty; nicely spiced but not overpowering. You can serve the chicken with plain rice if you want to simplify it, though.